
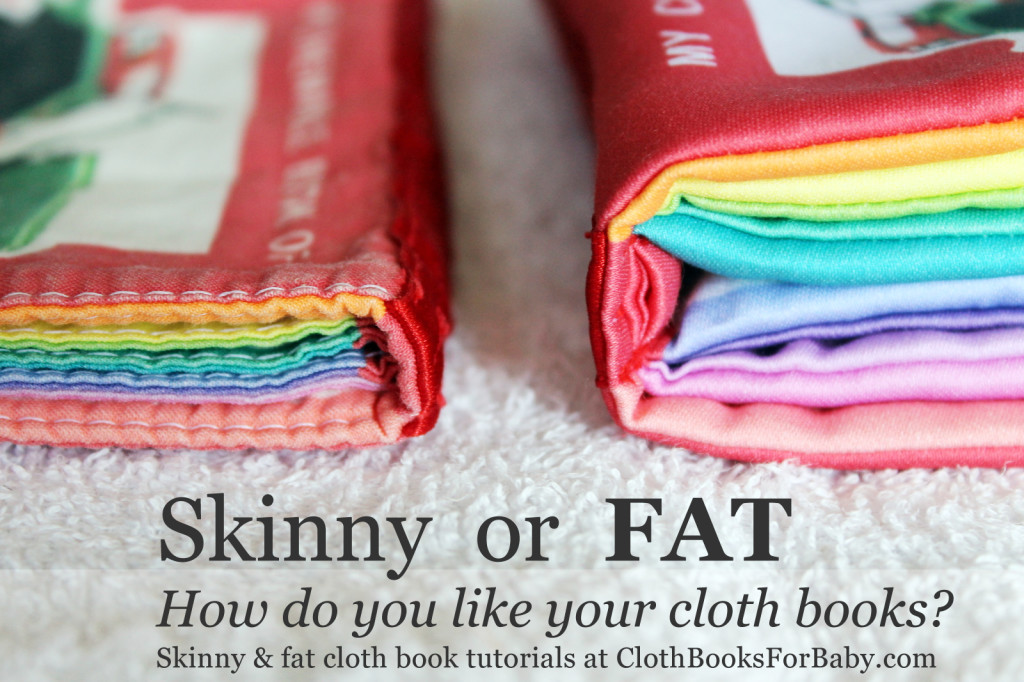
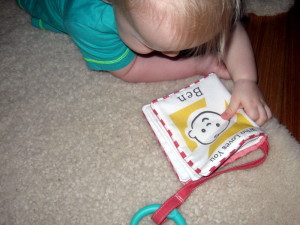
Click here for the fat cloth book tutorial.
The skinny cloth book tutorial is below.
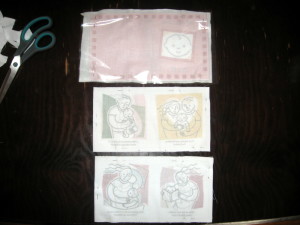
- Buy the fabric from Spoonflower here.
. - Iron the fabric.
Some people also wash the fabric first; but I’ve found that this can stretch & warp the fabric and makes it hard to match up the pages. So I wash afterwards.
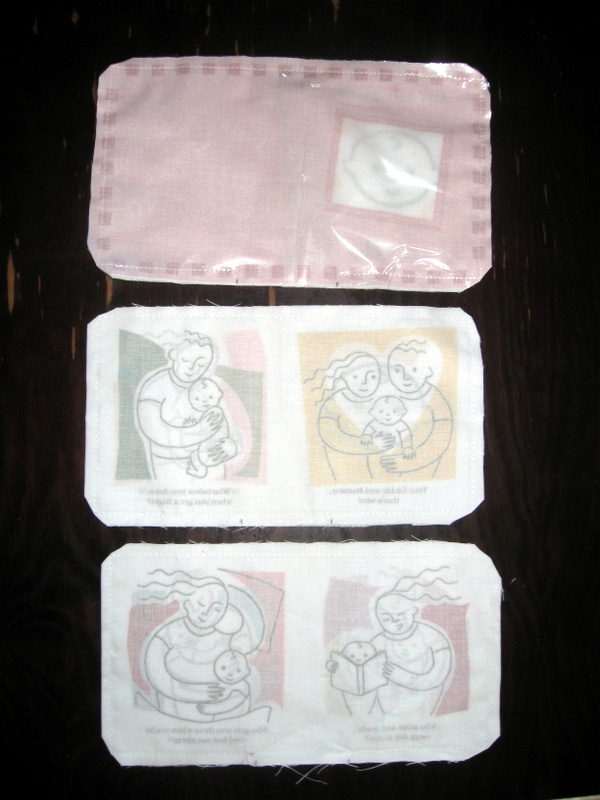
. - Cut the cover and internal pages into the strips pictured below.
The bottom strip is the OPTIONAL bookmark/hanger.
You can leave this out if you want.
. - Fold & pin the spreads in half so the printed parts face each other.
If you are making a bookmark/hanger, make it before you fold the cover in half. Fold the edges of the bookmark in and then fold in half and sew. UPDATE! The bookmark is really fiddly to make so what I use now is red ribbon – much easier!
. - Skip this step if you are not using the bookmark.
Fold and pin your red bookmark/hanger into place before folding and pinning the cover.
. - Fold and pin the cover.
OPTIONAL: Add padding and plastic if you want. I cut my padding from a cheap fleece blanket, and added a piece of clear plastic because our boy loves the crinkly sound it makes. This means the book isn’t 100% cotton though…
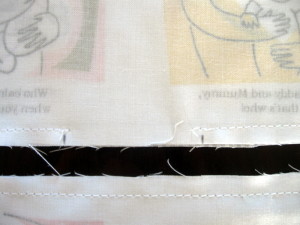
. - Sew around each folded page spread.
If you’re forgetful like me, mark your starting and end sewing points leaving a big opening so you can turn the page the right way around afterwards. I do this otherwise I forget about the opening and sew the whole thing shut.
. - Trim the corners.
This will help make the corners less fat when you turn the pages around.
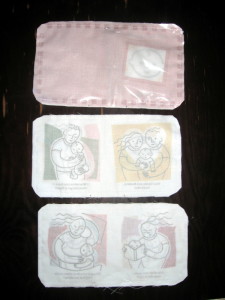
. - Turn your pages the right way around.
This is the fun part where you start to see your book come together! Iron each page again, being CAREFUL if you have plastic in your cover.

. - Sew (top stitch) around your pages again.
Sew as close to the edge as possible to close the openings.
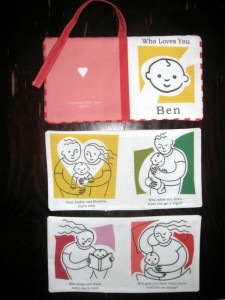
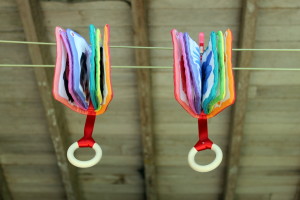
. - Assemble and sew spine.
Put your pages together on top of each other in the order pictured below and sew one or two lines down the centre to create a “spine” and complete your book.

. - TADA!!
I recommend washing the book on a delicate cold or warm setting before giving it to your baby.


Cute idea! Spoonflower is so expensive though…
Yes, unfortunately they’re the only people I can find to print my designs. $10 for a fat quarter book panel is a bit dear. But if you buy a yard (I sell a yard with all 4 of the chewable books on it) it does become more affordable, at about $4.50 per book panel.
Can you use the iron on photo transfer paper that you can print on?
Hi Jane, I haven’t so I don’t know for sure but you could try and see if it works.
Spoonflower has 2 for 1 fat quarter sale at the end of the year when they put out the tea towel calendar designs for the next year. It applies to any fat quarter, so that’s when I get my cloth books.
Yes, they have free-shipping days too which help lower the overall price of things.
Can you please let me know which Spoonflower fabric you recommend.
Thanks
Hi Narelle, the first choice on their list, the combed cotton, is a good choice. I also like the organic cotton sateen which is a better quality cotton. Another good choice if you don’t mind using polyester fabric is their silky faille – the colours on polyester are much brighter and more long-lasting than on cotton. Just avoid knit fabrics with stretch. Makes it more difficult to sew a cloth book if the fabric is stretchy.
Thank you 🙂
What program do you use to design your books?
Hi Amy, I use a variety of programs but to lay everything out just before sending it to the printers (Spoonflower) I use Publisher. And that’s what the cloth book templates use as well.
How do you so through such a fat book? The book I’ve made is too thick for a regular selling machine. I’m talking about sewing the spine.
With difficulty! But it is possible. A sharp new needle helps. My machine is an older singer model; not sure if that makes a difference. Sometimes I get to the end and the needle gets bent and I have to turn the wheel by hand to complete the line of stitching. Sorry I can’t be of more help.
Maybe you can try free sewing. By this i mean without the foot.
What type of plastic do you use?
Hi Jennifer, I used to use clear cereal-packet plastic (Oatbrits) which was the perfect size and is shown in this tutorial but now I use clear biodegradable cellophane as I want my cloth books to be 100% natural/biodegradable.
This is a really simple method, which I love. I tried it out on one of my books, you can see it here:
http://faithandfeltobsession.blogspot.com.au/2017/02/up-cycled-clothes-quiet-book.html
I love the method, but I think it would be better suited to books which have less going on around the page borders than mine did.
Thanks for putting the effort into this tutorial. It was super useful!
http://www.faithandfeltobsession.blogspot.com.au
I feel really dumb, but I cannot figure out the types of flowers in your flower book. I made your panels 3 years ago and we just say pretty (color) flower. The most common identifiable ones have names
No worries Darla! I ran a competition a couple years ago where the first to name all the flowers in the book received a free copy of ‘My Chewable Book of Blooms’. Here’s the post with the names of the flowers: https://www.facebook.com/ClothBooksForBaby/posts/637232963045178
Thank you! We’re having trouble finding baby books in Spanish that aren’t just translations of American kid’s books and aren’t bilingual. I have a heavy duty sewing machine, so I’m sure it’s up to the task of sewing even a thicker book. Off to check out your templates!
http://www.natashalh.com
I make these books for my grandkids on their 1st birthday and I use sewing transfers. You need an inkjet printer.
You can print many pictures on one sheet. Let it dry completely then remove paper backing away. Then you rinse them under cold water and iron it until it is dry. Cut your pictures and sew them on you pages. Easy to do and the kids love looking at the book.
Thank you for sharing your technique. Such a lovely personal gift for your grandchildren. 🙂
Hi Debbie, I’m back again! I love your method, but I tweaked it a little and came up with the Ribbon Quiet Book Binding Method to make it suited to thicker books with a lot going on along the spines. You can check it out here:
http://faithandfeltobsession.blogspot.com.au/2017/10/ribbon-quiet-book-binding-method.html
http://www.faithandfeltobsession.blogspot.com.au
Question-How do I assemble the book to have pictures on both Left & Right pages?